Stwb
Bronze Member
- Joined
- Nov 29, 2020
- Messages
- 467
Hi everyone!
A guide on how to edit those grim pictures for samp screenshots using photoshop or, in my case, photopea(Free online photoshop).The goal is to make them screenshots look like a movie so it makes the viewer watch it like a movie, that's cool af.First things first, the blanks. We need blank pictures and for these we gotta do these:
-/headmove = no head movement, sometimes the characters face weird angles which makes no sense
-/nametags= No name tags needed, it looks more /realistic/ and movie like and all that. Sometimes nametags are cool but oftenly they're not needed.-of course, when you take blanks, make sure you press F7 so there's no text and make sure you capture everything important. Pick an artistic angle so it looks bad ass. Imagine you're the camera guy filming breaking bad or the sopranos, no lame angles please.
Second things second, the text screens. We'll need these and some are only recommandations that make it easy af:
-/chatsize 20 = so you can roleplay more and see more of the chat and all that
-/fontsize (-3)= it depends on the resolution you play at, -3 on 1920x1080 is perfect for me. To test which fontsize you need for the screens I suggest you go lower and lower (-2, then -3, then -4) until the text suddenly becomes pixelated. If it gets pixelated go back one for example: (It gets pixelated af at -4? go to -3 and thats the fontsize you need for screns). BTW, I don't play with -3, its way too low, its only for screens, I play with fontsize 0, so I always change it to -3 take ss then back to 0.-Of course, you'll take screens of the chat after doing /blindme. (edited)
Now let's edit the screens alright? Alright. We gonna have 2 files open in photoshop just like in the picture shown.One is gonna be the blank and the main part of the project. Second one is going to be the chat blanks. I'll also attach the blank and chat I use.

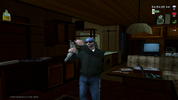
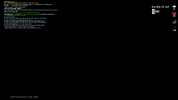
What we'll do now is we're going to go into the photoshop tab with the chat and simply select the parts we want to use. We'll copy them and past them into the first tab which contains the blank like shown in the picture. We'll also make sure to place the text chunks we got relatively close to the part of the screen where the actions is because we're going to crop it later
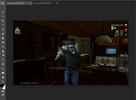
Now, the next step is to simply crop the picture using the crop tool. For me, the crop tool is the 5th tool in the bar on the left. We'll crop to 800x600. For this I use the fixed size option(make sure you're not using ratio and you're using size). We'll crop the important part of the picture and if you crop and you don't like it its okay because you can literally drag the blank picture around after you crop it so its okay.
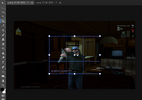
I don't like the angle so I'll drag the blank picture by selecting the blank picture layer from the right side then just press anywhere on the picture itself and drag it to a better angle. Then I'm going to select the text layer from the right side of photoshop and simply move it to a better spot. I always put my text down, on the left side. I like the way it looks like that but y'all can choose any other spot that's not awkward.
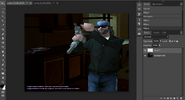
Ok, we're almost done all we gotta do now is give it some grim to make it movie like, more cinematic, more badass.We'll select the blank picture layer which is named in my situation "background". We'll go to the top bar section with all them settings and go to the FILTER setting then we'll add NOISE. We'll put noise on 10% or 5% or 15% depending on your taste. I'll go with 10% in my case, I don't want it to look too trashy. This trick helps it make more textured I GUESS??? Now that's basically it! There are more tricks tho!!! You just gotta be creative with them and go crazy, experiment, all that. Look at these!-make a screenshot black and white using adjustment layers and set the opacity of the adjustment layer to 10% so it looks colder.-Add a photography filter from the adjustment layers and change the color to orange if you want it warmer or to blue if you want the picture colder looking-You can experiment with other adjustment layers that will give other crazy effects like saturation or shade or whatever y'all want to experiment with.JUST MAKE SURE that you ONLY apply it to the background and not the text, the order in the right side panel should be background lowest then them filters then the text over all of these.
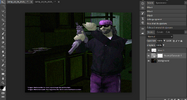
Now exporting the picture is very important. In the options export it as JPG and then decrease the quality to 70%. It gives more grim and it looks AMAZING like them old movies or series!! We don't need HD pictures in a 2004 game... it needs a lot of filters and all that so it looks good on forums, its all photoshop magic!
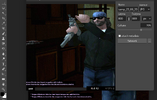
this is the final product!!!
feel free to add more noise if you think its necesarry, up to 15%.Feel free to decrease the image quality more than 70% but no more than 50%.Give them some grim but dont make them trashy!
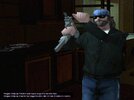
I got typos and all that, I DONT CARE ENOUGH TO GO BACK AND READ ALL THIS AND CORRECT EVERYTHING! OKAY!
If y'all need more help or anybody wants to add anything or whatever DO IT PLEASE!
A guide on how to edit those grim pictures for samp screenshots using photoshop or, in my case, photopea(Free online photoshop).The goal is to make them screenshots look like a movie so it makes the viewer watch it like a movie, that's cool af.First things first, the blanks. We need blank pictures and for these we gotta do these:
-/headmove = no head movement, sometimes the characters face weird angles which makes no sense
-/nametags= No name tags needed, it looks more /realistic/ and movie like and all that. Sometimes nametags are cool but oftenly they're not needed.-of course, when you take blanks, make sure you press F7 so there's no text and make sure you capture everything important. Pick an artistic angle so it looks bad ass. Imagine you're the camera guy filming breaking bad or the sopranos, no lame angles please.
Second things second, the text screens. We'll need these and some are only recommandations that make it easy af:
-/chatsize 20 = so you can roleplay more and see more of the chat and all that
-/fontsize (-3)= it depends on the resolution you play at, -3 on 1920x1080 is perfect for me. To test which fontsize you need for the screens I suggest you go lower and lower (-2, then -3, then -4) until the text suddenly becomes pixelated. If it gets pixelated go back one for example: (It gets pixelated af at -4? go to -3 and thats the fontsize you need for screns). BTW, I don't play with -3, its way too low, its only for screens, I play with fontsize 0, so I always change it to -3 take ss then back to 0.-Of course, you'll take screens of the chat after doing /blindme. (edited)
Now let's edit the screens alright? Alright. We gonna have 2 files open in photoshop just like in the picture shown.One is gonna be the blank and the main part of the project. Second one is going to be the chat blanks. I'll also attach the blank and chat I use.


What we'll do now is we're going to go into the photoshop tab with the chat and simply select the parts we want to use. We'll copy them and past them into the first tab which contains the blank like shown in the picture. We'll also make sure to place the text chunks we got relatively close to the part of the screen where the actions is because we're going to crop it later

Now, the next step is to simply crop the picture using the crop tool. For me, the crop tool is the 5th tool in the bar on the left. We'll crop to 800x600. For this I use the fixed size option(make sure you're not using ratio and you're using size). We'll crop the important part of the picture and if you crop and you don't like it its okay because you can literally drag the blank picture around after you crop it so its okay.

I don't like the angle so I'll drag the blank picture by selecting the blank picture layer from the right side then just press anywhere on the picture itself and drag it to a better angle. Then I'm going to select the text layer from the right side of photoshop and simply move it to a better spot. I always put my text down, on the left side. I like the way it looks like that but y'all can choose any other spot that's not awkward.

Ok, we're almost done all we gotta do now is give it some grim to make it movie like, more cinematic, more badass.We'll select the blank picture layer which is named in my situation "background". We'll go to the top bar section with all them settings and go to the FILTER setting then we'll add NOISE. We'll put noise on 10% or 5% or 15% depending on your taste. I'll go with 10% in my case, I don't want it to look too trashy. This trick helps it make more textured I GUESS??? Now that's basically it! There are more tricks tho!!! You just gotta be creative with them and go crazy, experiment, all that. Look at these!-make a screenshot black and white using adjustment layers and set the opacity of the adjustment layer to 10% so it looks colder.-Add a photography filter from the adjustment layers and change the color to orange if you want it warmer or to blue if you want the picture colder looking-You can experiment with other adjustment layers that will give other crazy effects like saturation or shade or whatever y'all want to experiment with.JUST MAKE SURE that you ONLY apply it to the background and not the text, the order in the right side panel should be background lowest then them filters then the text over all of these.

Now exporting the picture is very important. In the options export it as JPG and then decrease the quality to 70%. It gives more grim and it looks AMAZING like them old movies or series!! We don't need HD pictures in a 2004 game... it needs a lot of filters and all that so it looks good on forums, its all photoshop magic!

this is the final product!!!
feel free to add more noise if you think its necesarry, up to 15%.Feel free to decrease the image quality more than 70% but no more than 50%.Give them some grim but dont make them trashy!

I got typos and all that, I DONT CARE ENOUGH TO GO BACK AND READ ALL THIS AND CORRECT EVERYTHING! OKAY!
If y'all need more help or anybody wants to add anything or whatever DO IT PLEASE!
